
Last Updated on July 21, 2023 by Ben Fields
How to strum a guitar – a beginners guide
Introduction
This guide is designed for beginner guitar players who want to learn and implement the basics of strumming the guitar from scratch.
If you are a little more advanced player, you can also benefit from this guide because it will help you tighten what you already know (both theoretically and practically).
Moreover, you will also be able to check if you picked up some bad habits and gain the skill of reading strumming guitar patterns.
This skill is the key that opens the door for hundreds of different strumming patterns.
What is in this comprehensive guide
This course-like guide consists of seven lessons; each lesson’s material should be learned and practiced for two days, so you cover the entire course in 14 days.
You can find and download for free Each lesson’s exercises in a pdf format on our resources page.
Instructions + exercises, + demonstration videos will be on the page of each lesson to help you absorb the material faster.
I strongly recommend you bookmark this page or add it to your smartphone’s home page so you can tap back into it quickly and continue with your study.
The lessons contain relevant term explanations and instructions on reviewing the material and exercises. Read them carefully and understand them!
Even if the guitar is just a hobby for you, you want your hobby to sound great.
Wouldn’t you agree?
Also Read:
- The Lie Of “Practicing Harder”…
- The Secret to Fretboard Mastery
- Top Guitar Music Theory Books – Reviews for Maximum Improvement
The main goal of this course is:
Even though we cover a few basic chord shapes, that’s certainly not the primary goal of this course.
We’ll not focus on chords (those you can learn by the hundreds later). We will “laser-beam” focus on your strumming hand development, so it doesn’t matter which chords you’ll choose to play later.
Most exercises contain the same four chords so that you can focus on your strumming hand development.
Chord-wise, it may be boring. You may not understand the overall picture from the start, but your results will make up for it. I’ve implemented this method with my students, and it works. They play better!
Despite that, you can find many “beginner” chord resources here, here, here , and here.
Are we going to learn how to read notes?
This “how to strum a guitar” course aims not to teach you how to read musical notation (note reading) but to get you strumming the guitar and sounding great within a short period.
To do so, I want you to understand and remember this next term: RHYTHM SLASHES.
Rhythm slashes are graphic symbols that represent the rhythm’s time value (duration). By that, they differ from note values representing both pitch and duration.
We’re only going to use rhythm slashes and rests throughout this course.
With guitar study, there is a specific way to indicate how long a rhythm slash or a note should be played (ring) or not played (rest).
Let’s make some order.
Notes represent what pitch to play and for how long.
Rests represent when to pause and not to play.
Rhythm slashes represent only the time values (duration).
Luckily, both note values and rhythm slash values are almost the same. The difference is on the note head. (Explained below)
Some preparation work is needed.
In case you don’t already know them, get familiar with these next terms:

The top number represents the number of beats in each measure. And the bottom number is the type of beat.
Beats are pulses/time units you don’t necessarily hear, but you should always feel them.
BPM = Beats Per Minute = the number of beats (clicks) a metronome plays in one minute.
What is a metronome? A metronome is a small device that counts beats.
What is it for? It gives you a pulse for reference while practicing and improves your sense of rhythm.
For example, 60 bpm means that the metronome will produce a sound (a click or a sound that represents a beat) every second.
120 bpm means that you will hear the click every half a second.
You can adjust the metronome’s beat to any tempo (speed) you need; thus, practice different speeds.
Usually, you’ll start at a slow tempo and gradually go faster to the desired speed.
You don’t have to buy a metronome, to begin with.
There’s an excellent free metronome online you can use: https://www.metronomeonline.com/
I highly recommend practicing with a metronome after gaining some skills in this course’s material. The results are always better.
You can start practicing the material at 40-50 bpm (slow) and gradually get to 80 bpm, which is fine for what we cover.
Some more basics:

The next step
Now that you know what to expect you can start by going to the first lesson.

How to strum a guitar Lesson #1
I’ll start this lesson by defining the fundamental terms of strumming the guitar.
If you already know terms like a pick, what strumming is, what’s a downstroke and an upstroke and the graphical symbols that represent them, you can skip to the second section.
The second part of this lesson (see “this lesson’s focus”) focuses on the basic time values, their graphic symbols, and the introduction to rhythm slashes.
(After all, strumming patterns are rhythmic patterns, and these are written with rhythm slashes).
You see, I intend to be thorough with you.
By that, I’m not only going to physically show you basic and more advanced guitar strumming patterns (with the help of videos), but I’m also going to teach you how to read and write them.
The goal is that by the end of this course (seven lessons), you can play and strum your guitar fluidly and read, write and continue learning advanced guitar strumming patterns by yourself.
The third part of the lesson is the to-do part. A short video demonstration of two basic guitar strumming patterns/exercises and their charts.
This lesson’s practice recipe
Go over this lesson’s exercises two times a day for the next two days, no more than five to ten minutes for each practice.
Do it only after you’ve read and understood the explanations and terms used.
Basic terms
PICK – Usually, a small piece of plastic using for strumming or picking the strings.
STRUMMING – Gliding the pick, thumb, or your strumming hand’s fingers lightly across all the strings together in an up or down motion.

This Lesson’s focus:
A whole and half note strumming, and how they look and their durations.
Whole note – a whole note has a time duration of four beats in 4/4 time. (i.e., you strum or pick once and count four beats). You can count in your mind or aloud, but the best way is to tap with your foot.

Whole notes are written without a stem!!!
Half note – a half note has a time duration of two beats in 4/4 time. (i.e., you strum or pick once and count two beats)

Half notes are written with a stem.
Summary of time values:

Keep in mind for the future if you were to write specific notes within a particular chord, then you would have to use “real” notes and their time values instead of rhythm slashes.
How to practice the next two guitar strumming patterns
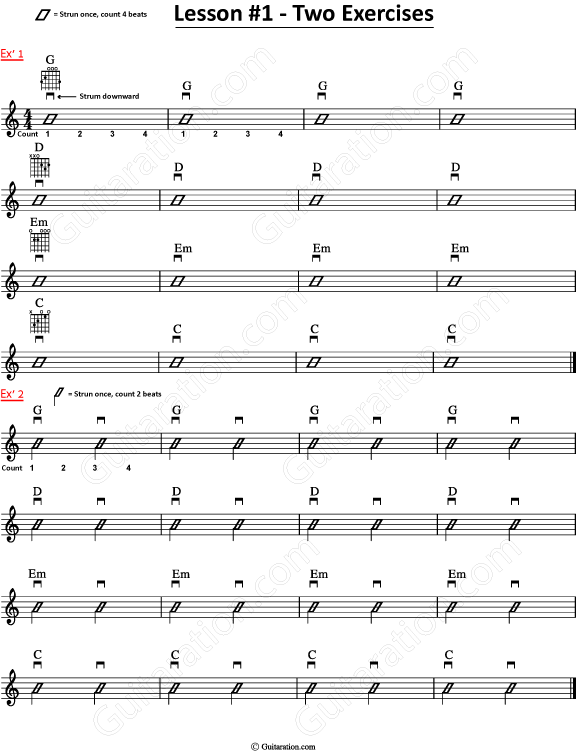
First, here is the most basic guitar strumming pattern,
Listen to how it sounds and try to “catch” my strumming hand and body positioning.
I’m playing an electric Gibson Les Paul Standard in this video. However, you can also play all guitar strumming patterns presented in this course on acoustic or classical guitar.
I’m also changing the chords every four bars, but if you’re at a stage where it is hard for you to do, you can play the entire exercise on one chord or even better on open strings.
I know this sounds very basic, but as I mentioned in the introduction to the “How to strum a guitar” course, this course is designed to skyrocket your strumming hand within 14 days.
Please stick with it, and follow through with all exercises and details because they are designed in a compounding matter, so you’ll get a killer strumming hand.
This is the second out of the two guitar strumming patterns. Look and then see how it is written professionally ( below ). Make sure you understand it.
Explanation of how to practice these two guitar strumming patterns
The first exercise contains 16 bars.
Each chord gets four bars.
Each bar gets a whole note (i.e., strum downward once and count to four while the chord is ringing). The strums fall on the first beat of each bar. (At the same time, you count the 1).
Play slowly; you need to perform many tasks at the same time.
Both exercises are to be played with downstrokes only.
The second exercise contains 16 bars.
Each chord gets four bars.
Each bar gets two half notes (i.e., strum downward once and count “one-two,” and then strum downward again on the third beat and count “three-four”). The strums fall on the first and third beats.
Watch both videos attached to this lesson as often as possible for the next two days. Let it sink into your memory.
You can download this guitar strumming patterns chart in a pdf format for free on our resources page.
The next step
Download and print the how to strum a guitar – Lesson #1 pdf from our resources page.
Try to play the patterns while reading them from the printable.
When you feel comfortable playing them, try to play along with the two videos of this lesson. This will start sharpening your sense of timing.

How to strum a guitar – Lesson #2
Hopefully, you spent two days on the first lesson of this course as I instructed.
The basic terms we’re going to cover today are
Rest = Pause and don’t play.
Strumming hand strings mute – When you put the palm of your strumming hand on all of the strings, it mutes them i.e., they stop ringing.
This Lesson’s focus:
Quarter Note rest and Dotted Half note (sounds big but quite simple).
Quarter Note: A quarter note gets one beat. In 4/4 time, four notes would be played.

Dotted Note: Placing a dot to the right of any note value lengthens the value by one-half of the original value. A dot can also be placed to the right of a rest, causing increased value to happen.
Dotted Half note – a dotted half note has a time duration of three beats in 4/4 time. (i.e., you strum or pick once and count three beats)

When writing rhythm, we will use the dotted half-note rhythm slash.
Rests look the same both in rhythm slashes and note writing.
Summary of time values:

We’ll use right-hand string mute (see above basic terms) on every quarter rest (the fourth beat of each measure). That will give you time to interchange between chords smoother and without the strings making noise.
This lesson’s practice recipe
Go over this lesson’s exercises two times a day for the next two days,
Play each exercise twice for each practice.
How to practice the following four guitar strumming patterns
Each exercise consists of 8 bars
The first exercise holds the same strumming pattern throughout.
A simple dotted half note (three beats in value) plus a quarter note rest. I want you to mute the quarter rest (it falls on the fourth beat, as explained above). Watch the first video below.
This will sharpen your strumming and coordination.
In the second exercise, you’ll need to strum quarters which means you’ll strum four times (four beats) for each measure.
Pay attention to exercises 3-4 because I allowed myself to “play” with variations, so you’ll need to have your eyes on the screen (attached strumming patterns below) while playing.
All strumming directions are still downward (it will change on the fifth day’s lesson).
Don’t forget to follow the chords.
Use visualization exercises and do them whenever you can during the day, even if it looks or feels stupid.
What’s a visual exercise?
It’s an exercise you don’t need to practice on the guitar.
You pretend to play; you imagine you’re strumming the guitar, but you strum the air while imagining your guitar. You can do it anytime, anywhere.
Do it while walking with the dog, talking on the phone, watching T.V
“The more, the better.”
What’s the benefit? It enables your brain to absorb a movement faster.
Guitar strumming patterns – Ex’ 1
Guitar strumming patterns – Ex’ 2
Guitar strumming patterns – Ex’ 3
Guitar strumming patterns – Ex’ 4
Here is the guitar strumming patterns chart for this lesson.
Understanding what you see is a good sign because it can make things much clearer.

You can download this guitar strumming patterns chart in a pdf format for free on our resources page.
The next step
Download and print the how to strum a guitar – Lesson #2 pdf from our resources page.
Try to play the patterns while reading them from the printable. (don’t neglect the reading part, it’s very important).
When you feel comfortable playing them, try to play along with the four videos of this lesson. This will continue shaping your strumming hand for the next lessons.

How to strum a guitar – Lesson #3
Let’s start with this lesson’s basic music terms.
Basic terms
Alternate strumming or picking – Up and down motion of your strumming hand (as one would when shaking hands) is called alternate strumming or alternate picking (for solo or melody playing):

Counting with your foot (tap) – Tap your foot along with the pulse of the music.
Your foot will move down with the downbeat and the down-stroke strum and up with the upbeat and the up-stroke strum.
Downbeat (sometimes called On-beat) – Played with a down stroke and falls on the pulses.
Upbeat (sometimes called Off-beat) – Played with an upstroke and falls in the space between the pulses.
This Lesson’s focus:
Eighth Note – An eighth note receives a half beat. In 4/4 time, you would play eight notes per measure.
The eighth note study requires us to understand how to divide a quarter note into two equal-in-time eighth notes.
In 4/4 time, we count the down beats: 1, 2, 3, 4, and the upbeats get the count of “&.”
![]()
Look at it in another way:
If you count with your foot, the downbeat is when your foot touches the ground, and you hear the tap (and your hand strums downward). The upbeat is when your foot rises before it taps again (and your hand strums upward).

This lesson will only contain two-eighths and four-eighths, and we will combine them with quarter notes and quarter rests that you already know from lesson #2.
Pay attention! You are starting to work on your alternate strumming motion.
This is the most important one at your current stage.
We will use an eighth-note rhythm slash, which has the same duration as the eighth note but a different graphic symbol,
![]()
Summary of eighth notes

This lesson’s practice recipe
Go over this lesson’s exercises two times a day for the next two days,
Play each exercise twice for every practice.
Guitar strumming patterns – Ex’ 1
Guitar strumming patterns – Ex’ 2
Guitar strumming patterns – Ex’ 3
Guitar strumming patterns – Ex’ 4
How to practice the following four guitar strumming patterns
The first exercise contains 16 bars.
Each chord gets two bars.
Each bar gets two eighth notes and three-quarter rests (i.e., strum the first eighth note with a down stroke, the second eighth note with an upstroke, then mute the strings for three-quarter rests).
The second exercise contains 16 bars.
Each chord gets four bars.
Each bar gets four eighth notes. (i.e., strum: down-up-down-up, the rest of each measure needs to be muted on the quarter rests as in the previous exercises).
Exercise 3 is a variation.
Exercise 4 is one of the most essential exercises in this course because it covers the alternate strumming technique, which is the key to obtaining a better sound and more excellent skill in your playing.
Practice visualizing “Exercise 4” of this lesson as much as possible in your spare time for these two days.
Here is the guitar strumming patterns chart for this lesson.

You can download this guitar strumming patterns chart in a pdf format for free on our resources page.
The next step
Download and print the how to strum a guitar – Lesson #3 pdf from our resources page.
As with previous lessons, try to play the patterns while reading them from the printable.
When you feel comfortable playing them, try to play along with the four videos of this lesson.

How to strum a guitar – Lesson #4
Let’s start with this lesson’s focus.
This Lesson’s focus:
Ties and pattern combinations
Ties are essential because there are used in many common strumming patterns in pop, rock, and country songs.
Tied notes are when two notes or more are tied together with a curved line.
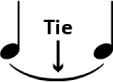
You pick or strum the first note and let it ring over the time values
of the notes it’s tied to. Here’s an example:
![]()
Remember, the starting point of every strumming pattern is the alternate picking.
So if a pattern confuses you, break it down to the basic alternate movement. This should help you understand why the directions of a certain strumming pattern are the way they are.

This lesson’s practice recipe
Go over this lesson’s exercises two times a day for the next two days,
Play each exercise twice for every practice.
How to practice the following four guitar strumming patterns
In the next day’s lessons, we’re going to memorize common strumming patterns,
which you can use to strum almost any song.
The first common guitar strumming pattern is found on the first bar of the fourth
exercise of today’s lesson. (Blue bar – see the guitar strumming patterns chart below).
You also have “ The Blue Bar – Up To Tempo ” video to understand how it sounds when played fast.
Memorize it, practice it at least twice, two times a day, and also use the visualization method.
By memorizing it, you start building your BANK of guitar strumming patterns.
A bank you can tap into and choose a pattern or combine different patterns that match a song you play.
Other than that, the three first exercises of this lesson are designed to improve your fluidity of both playing and tied rhythm reading.
Don’t skip any exercise! You’re on the right track to succeed in this course’s goal.
Guitar strumming patterns – Ex’ 1
Guitar strumming patterns – Ex’ 2
Guitar strumming patterns – Ex’ 3
Guitar strumming patterns – Ex’ 4
The blue bar – up to tempo
Here is the guitar strumming patterns chart for this lesson.

You can download this guitar strumming patterns chart in a pdf format for free on our resources page.
The next step
Download and print the how to strum a guitar – Lesson #4 pdf from our resources page.
As with previous lessons, try to play the patterns while reading them from the printable.
When you feel comfortable playing them, try to play along with the four videos of this lesson.

How to strum a guitar – Lesson #5
You’re halfway through this “how to strum a guitar” course.
The following three lessons are fun because they contain more common and popular guitar strumming patterns.
I’d like to know how things are going for you and if you’re making significant progress. After all, it’s a short course that supposes to give you fast results so you can start playing songs within two weeks.
By now, you’re already familiar with the lesson’s structure, so I’m allowing myself to dive into this lesson.
This lesson’s practice recipe
Go over this lesson’s exercises two times a day for the next two days,
Play each exercise twice for each practice. Once finished playing, memorize exercises no five and no 6.
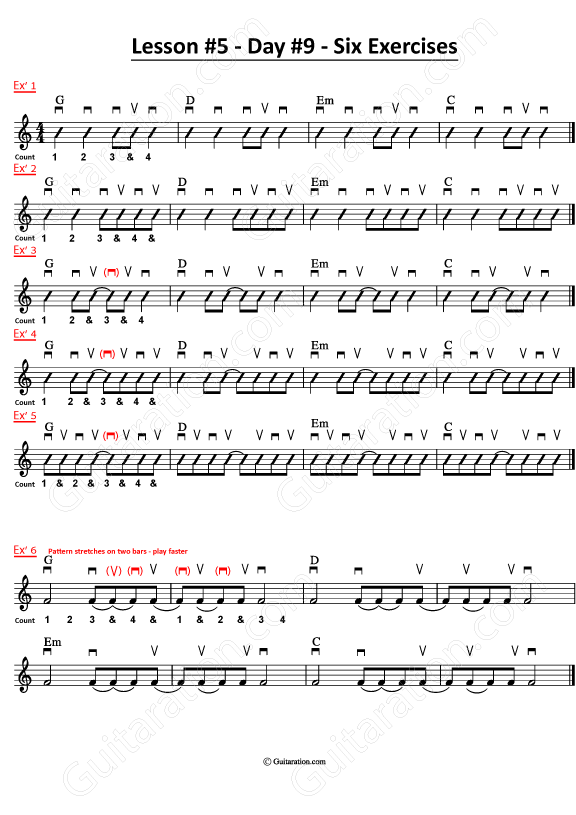
This Lesson’s focus:
- Memorizing two common and useful guitar strumming patterns.
- Play one chord for each bar.
The first five exercises (first five rows) are Reading exercises and, in fact, five common guitar strumming patterns that you can add to your strumming patterns bank.
For now, I only want you to memorize exercises No 5 and 6.
Each one is only slightly different from the other, so it’s easier to memorize.
The sixth exercise is one of the most common guitar strumming patterns and stretches on two measures for easier understanding. This pattern is better to understand both by ear and by reading. (Watch the “ Day #9 – Exercise 6 Two Bars pattern ” video below).
Watch and understand both videos of this lesson. (It’s very helpful).
Pay attention to the fact that each measure gets one chord in today’s exercises.
That might be a little harder to play, but the good news is that it will sound like actual songs.
I know you’ll manage if you do as I instructed until now.
Devour this lesson and be proud of yourself for your progression since the
first lesson.
Look at this lesson’s guitar strumming patterns chart before you watch the videos.
You can download this guitar strumming patterns chart in a pdf format for free on our resources page.
Two bars strumming pattern
Guitar strumming patterns – Ex’ 6
The next step
Download and print the how to strum a guitar – Lesson #5 pdf from our resources page.
Try to play the patterns while reading them from the printable as usual.
When you feel comfortable playing them, try to play along with the two videos of this lesson.

How to strum a guitar – Lesson #6
This lesson’s practice recipe
Go over this lesson’s exercises two times a day for the next two days,
Play each exercise twice for every practice. Once finished playing, memorize exercises No six and No 8.
This Lesson’s focus:
Fretting hand mute
The fretting hand is the hand that holds the guitar neck and presses the frets
to play notes or chords.
Do you remember you learned how to mute the strings with your strumming hand in day #3’s lesson?
In this lesson, we’re going to mute them differently.
This way will give your strumming a more “percussive” sound.
Percussive means it is similar to the sound of drums.
This gives you a more dynamic strumming that sounds fuller and richer than what we have learned.
The main difference between this lesson’s mute and the one previously learned is that you’ll need to strum the muted strings in today’s practice.
This is where you get the “percussive” sound from.

The way to mute with your fretting hand is by releasing the pressure from the chord and laying
all fretting fingers lightly on all six strings (don’t go too far from the chord so you can get back to it quickly),
then strum and listen. No string should ring.
Watch the videos to see and understand the technique.
How to practice the following eight exercises
You can simplify the exercises for this lesson by practicing all strumming on just one chord.
The Em chord would be best for this because it only has two pressing points, allowing you to go back and forth between the mutes and the chord more easily.
If you already can play the chords written, do so.
Pay attention to the strumming directions and the chord changes.
Please work with this guitar strumming patterns chart alongside the videos below.

You can download this guitar strumming patterns chart in a pdf format for free on our resources page.
Guitar strumming patterns – Ex’ 1
Guitar strumming patterns – Ex’ 2
Guitar strumming patterns – Ex’ 3
Guitar strumming patterns – Ex’ 4
Guitar strumming patterns – Ex’ 5
Guitar strumming patterns – Ex’ 6
Guitar strumming patterns – Ex’ 7
Guitar strumming patterns – Ex’ 8
The next step
Download and print the how to strum a guitar – Lesson #6 pdf from our resources page.
Try to play the patterns while reading them from the printable as usual.
When you feel comfortable playing them, try to play along with the eight videos of this lesson.

How to strum a guitar The 3/4 time – Lesson #7
Okay, you’ve got to day 13 of how to strum a guitar free course, the last lesson for this course and to what I consider as the “extra mile.”
For the next two days, I want you to divide your practice time into two practices.
- First practice – Play every single exercise from the beginning of the course to the end once.
- Second practice – Each exercise should be played twice in this lesson’s material.
It might be a little time-consuming, but as I mentioned, that’s the “extra mile” before you achieve your goal.
“NEVER QUIT ON THE FINAL MILE”
This Lesson’s focus:
The 3/4 time.
Up until now, we only played and practiced 4/4 time.
For this lesson, we’ll go over the 3/4 time. It’s less common than the 4/4 time, but you can still find it in songs. Here are a few examples:
Or “Nothing Else Matters” by Metallica
In 3/4 time, we have three pulses (beats) for each measure.
The beat units are quarter notes.
(For comparison, the 4/4 time has four quarter note beats for each measure).
The 3/4 time is usually played with an accent (>) on the first beat; otherwise, it would be hard to determine where the first beat is.
This is the “feel” of this time signature.
How to practice the following eight exercises
I’ve changed the chords and put Am and C instead of the previous chords. Just to add an extra spice to these exercises.
If you find playing at your current level hard, just use G, D, Em, and C,
as you did before. What matters is your strumming hand focus.
Tap your foot 3 times for each measure.
Use alternate strumming (when indicated) as you did until now.

You can download this guitar strumming patterns chart in a pdf format for free on our resources page.
Guitar strumming patterns – Ex’ 1
Guitar strumming patterns – Ex’ 2
Guitar strumming patterns – Ex’ 3
Guitar strumming patterns – Ex’ 4
Guitar strumming patterns – Ex’ 5
Summary
Download and print the how to strum a guitar – Lesson #7 pdf from our resources page.
Try to play the patterns while reading them from the printable as usual.
When you feel comfortable playing them, try to play along with the eight videos of this lesson.